Is Sandblasting the Best Method for Decorating Glass and Ceramics?

Have you been wondering how to etch on glass or ceramics to make unique gifts from your home? Maybe you've been pondering which personalized gifts to buy for a wedding or holiday that will look nice and also stand up to everyday use. I’ve been etching glass since 2005, and I’ve tried a lot of methods. Let me give you the run-down on your options so you can make the best decision for your situation.
The story of my years of etching experience
I started my etching journey when I wanted to make a special gift for my dad, who was getting into mixology. I picked out a set of zig-zag stemmed martini glasses, and bought a little bottle of etching cream, a foam brush, and some letter stickers. I followed the instructions in a magazine article, masking off stripes and sticking cocktail names to the glasses with the stickers. It was going to be a-MAZE-ing. The etching cream was thick and full of crystally globs, but I spread it onto the glass just as my instructions described.
The final results were, frankly, disappointing. After hours of planning, masking, “painting” on the cream, waiting around for it to do its thang, and then rinsing it all off, my perfect zig-zag glasses had some blobby, steaky, etched lines on them with some text in between. The cream had leaked under the stickers and tape in a few places, and the etched areas were very uneven. They weren’t terrible, but they weren’t the masterpieces I’d envisioned, either. I promptly gave up on glass etching.
A while after this crafty experience, I decided I wanted to draw on glass. I’d always wanted to be an illustrator, and I also wanted to make and sell jewelry. The best way to combine these two interests was to draw directly onto small glass flat marbles with a Dremel tool and diamond-coated burrs. This was just what I’d been looking for! The ideas in my head instantly became reality, on a very, very, small scale. I soon upgraded my heavy, wobbly Dremel to a smooth-as-silk dental drill that used the same burrs. I also learned that I could engrave onto any glass or ceramic surface, and began engraving pint glasses, shot glasses, vases, candle holders, and ceramic tiles. I now had an online shop that was really taking off!
(Sign up for our newsletter to see our latest sandblasted creations!)

The only problems with hand-engraving are that it’s imprecise, dusty, dangerous, tedious, and the final etching doesn’t stand out very crisply. I guess that’s a lot of problems, huh? My work was suddenly in high demand, and Urban Outfitters had just asked if I could make a few thousand pint glasses for their stores. I think I actually cried, thinking of how much my hand was going to hurt if I was to fill that order, not to mention the months of my life I would basically have to give up in order to make it happen. There had to be a better way.
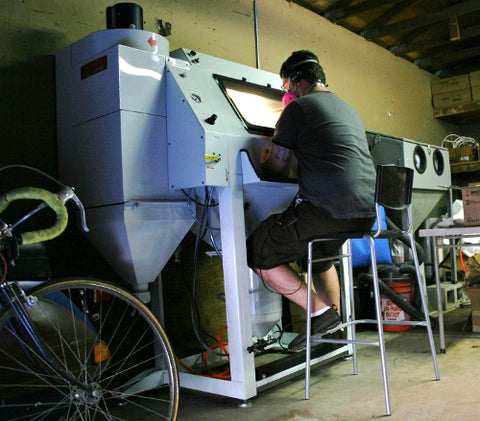
My dad had been encouraging me to try sandblasting since the very beginning of my glass etching experiments, but it just seemed so BIG. Sandblasting was daunting. It seemed expensive, intimidating, and like a huge commitment because so much equipment was involved. We’d need a big air compressor (60 gallons), 50 lbs of abrasive (or “grit”), a sandblasting cabinet to keep the grit and glass dust contained, a pressure pot to hold and regulate the grit, assorted hoses and nozzles, a dust collector so the grit and glass dust wouldn’t make it out into the room, and a photo-emulsion system for making detailed stencils.
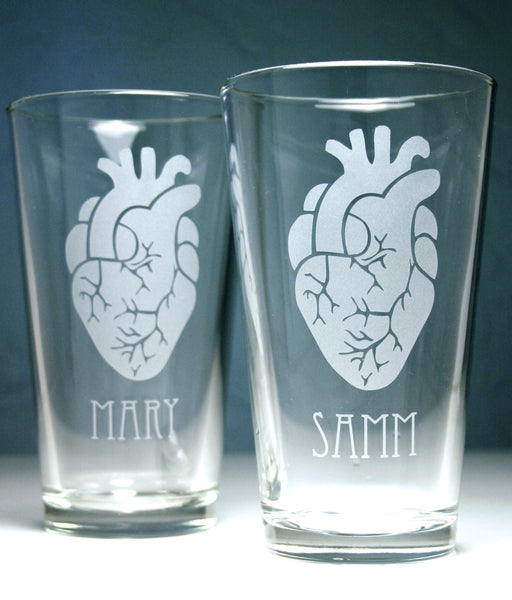
We brokered a licensing deal with Urban Outfitters, and used the (very small amount of) money we earned to buy some really basic sandblasting equipment and rented a small studio in which to keep it. My husband, Sean, quit his job to help me with production (I could finally get some help with the etching!). The warehouse with our studio was hot in the summer, freezing in the winter, and a hassle to get to, but we were able to make large amounts of completely identical etched glasses in a fraction of the time it had taken me to draw each line by hand. Additionally, the etched designs were crisp, evenly frosted, and just as permanent and scratch-resistant as ever.
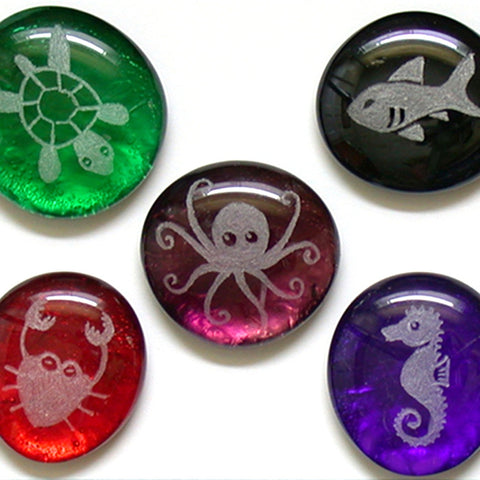
Since the days of this first studio, we’ve moved all our work into a house, upgraded to a fancy-schmancy recirculating sandblasting cabinet, then back into a bigger studio. We have 3 people who work for us, and sometimes we bring on seasonal helpers and collaborate with other artists. We still make our stencils by hand, mask each item one at a time, and inspect them carefully for flaws. We’ve expanded our product line to include ceramic coffee mugs, and have over 40 designs, plus custom work. Sandblasting isn’t the only way to get art onto a smooth surface, but it’s certainly the best way I’ve found.

Common Questions about Sandblasting, Etching, and Decorating, Answered!
Is sandblasting safe?
Absolutely! As long as you have proper equipment and gear, anyone can do it. You do need to wear a particulate respirator (not just a paper dust mask!) while sandblasting, and you need to do your blasting inside a cabinet with a dust collector. If you work outside of a cabinet (like, to sandblast a wall, or glass window, or giant headstone or something), you’ll need dust collection, a blasting suit to protect your clothing and body, and a full hood with mask. This is super hardcore sandblasting though, since you can blast glasses and mugs in a small cabinet.
For our sandblasting cabinet set-up with dust collector, we just wear a respirator and thin vinyl gloves while working. If you spray sandblasting grit directly onto your skin, it will sting, but you’d have to blast yourself for a long time to really get hurt. The industry standard for sandblasting abrasives is silicon carbide (which we use) or aluminum oxide. Both of these can be reused over and over again, and are much safer than the silica (sandbox) sand everyone assumes sandblasting uses. Silica sand breaks down fast and can cause silicosis (“black lung”) if you breathe it in, which is definitely dangerous, so don’t even consider using it.
Is sandblasting expensive?
It’s more expensive than a lot of the other methods described here, especially things like etching cream kits or Sharpie markers. It can be cheaper than getting a laser though, and if you want to do high quality production work, it will be completely worth it. You can also start off with simple equipment, like I did, and upgrade as you can afford it. Harbor Freight has some pretty affordable siphon cabinets so you don’t even need a pressure pot, and you might be able to get away with a much smaller air compressor than 60gal. if you don’t mind the noise, and aren’t doing a ton of production. Some people even make their own blasting cabinets out of sinks. Research your options, and you may be able to get set up for a few hundred dollars.
My initial sandblasting set-up was closer to $3000 (in 2009), including the air compressor. If you’re just looking to purchase items that have been sandblasted, they’re often comparable in price to screen printed or laser etched products. The results may be better, but they do take at least as long to produce because of all the steps involved.

Does sandblasting scratch or wear off?
Nope. It’s carved deeply into the glass surface, so it can’t be removed. Dish washing can’t buff it out or scratch it. Ceramics that have been blasted through the glaze may appear to be delicate, but the remaining glazed areas are as sturdy as they began. Our sandblasted mugs that are 6yrs old don’t show even the slightest forms of wear.
Is sandblasting dishwasher-safe?
Absolutely! As long as the original item was safe for dishwashers and microwaves, the sandblasted version will be too. Since sandblasting doesn’t add anything to an item, it only takes away the surface, it can’t be damaged while washing. Now, dropping it onto a concrete floor might be a different story.
How do I start sandblasting?
Get your Google on! There are online communities and forums for sandblasting, like most other hobbies and professions. I got most of my info from cuttingedgesandcarving.com, which no longer appears to be active. Ikonics Imaging is where we got our pro cabinet, and most of our supplies like resist material, and they put out a lot of really great instructional videos. You could probably also just go to Harbor Freight and ask someone to get you started there. Here's a gallery of our first time using our sandblasting equipment. One of the most fun things is experimenting and trying new things.
How do these decorating methods compare?
How is sandblasting different from laser etching?
Sandblasting uses a stencil or “resist” that protects all the areas of an item that you don’t want to get etched. Lasers are programmed by a computer to simply draw your design right onto the surface without needing to be masked. This saves you a lot of time in the prep stage, but there are a few drawbacks to laser etching.
Time. Lasers still take a long time to etch designs, so if you have a lot of items, and large etched areas, you’ll need to sit around and wait a long time for the laser to be done with each one, so you can load in the next.
Cost. Lasers are expensive, and not the kinds of things people frequently have laying around in their garages, or selling on Craigslist. They’re not practical for the hobbyist, especially if you just want to make a few special gifts.
Durability. I’ve heard people say that laser etching wears off over time. I’m not totally sure how that works, but I’ve seen some laser-etched glassware at thrift stores that did, in fact, look like the design was fading. It could be that scratches from dish washing had just blended in with the etched areas, obscuring their edges.
Lasers don’t cut into your glassware, they just produce a matrix of tiny cracks in the very top surface. This means you can see a pattern in the etched area, unlike the even frosting that sandblasting produces. It also means that the edges will never be sharp and crisp, like etching with a stencil. It will look feathered and soft, especially if you’re creating a lot of small text. Because the tiny cracks are just beneath the surface, you also won’t really feel the etching with your fingers. No big deal, but I happen to really like the tactile sensation of feeling the etched designs that sandblasting produces. This is especially noticeable with ceramics or stone, since lasers aren’t capable of carving deeply into anything.

What are lasers good for, then? They are awesome at carving through paper, some metals, and burning into the surface or cutting through wood and bamboo. They also produce really intricate detail on these materials, so if you don’t mind the drawbacks of price, lack of texture, time commitment, and durability, they could be really useful for production work.
How is sandblasting different from screen printing?
Screen printing can easily be done from home with kits you can buy on Amazon or Martha Stewart. The biggest draw of screen printing, in my opinion, is that you can use color! Etching just produces a white, frosty design, but screen printing is actually adding ink to your items, so the sky’s the limit on colors.
Stencils. Both sandblasting and screen printing use stencils to get the design only on certain areas of your item. We use a UV light box to expose our stencil material, then pressure wash it, dry it, and apply it to the surface. Screen printing uses the same method, only you can reuse the screen over and over, where sandblasting stencils are single-use. You can also make sandblasting stencils from vinyl that you cut yourself or cut with a plotter or laser, but these are also single-use.
Cost. Screen printing on glass and ceramics from home can be really easy to get into because the kits are cheap and easy to come by. These are great for small scale projects, but might be hard to keep up with if you’re trying to start a business and do a lot of production.
Durability. Screen printing may claim to be permanent, and some inks are theoretically dishwasher-safe (especially if they’re fired in a kiln), but because it’s still a paint that has been fixed to just the surface of a glass, it can always be scratched off over time. Pretty much everyone seems to have a glass in their cabinet from years ago, with a colorful design that’s worn away from lots of use (like the one on the right, which we use almost every day). Keeping these items out of the dishwasher should help with longevity, but this is not a problem at all with sandblasting. Since sandblasting is actually removing the top layer of glass (or an entire layer of ceramic glaze), there’s no way to damage this art.
Safety. Some screen printing inks aren’t food-safe, and shouldn’t be put on a glass near where your mouth or food would come in contact with it. Beware of this before you put your design on a cup or bowl!

How is sandblasting different from decals?
A lot of big companies add decals to glassware and ceramics for full-color designs. I don’t know anyone who does this at home, but it’s easy to find companies that can do this for you online (especially overseas). This is great if you need 1,000 matching mugs for a promo, but not great if you just want a set of 4.
Lots of options. Because these decals can mimic glass etching, they can look pretty decent if you don’t want to etch something yourself but like the classy look of etched glass. They can also be quite detailed and come in full color, if you want something really flashy.
Durability. These are just like the screen printed items, in that they are just applied to the surface of a glass or mug, and will definitely wear off over time. If you want something high-quality that will be loved for years, these will never compare to etching. Just check out the mustache highball glass to the left, which was made for Urban Outfitters using our licensed artwork. I love this glass, but we use it in our house every day, and the decal is wearing out in the center and both sides.
Slide Decals for ceramics and fused glass are a bit different. If you’re not putting art on a pre-made drinking glass, there are companies that make decals for fusing onto glass or kiln-firing onto ceramics. You can even get printer paper to make your own! The drawbacks of these decals is that the print-your-own kind turn brownish when fused, so true black or other colors will have to be special ordered from a manufacturer. They also tend to have jagged edges from being printed right from a computer, but maybe I’ve only seen low-res printed art. The good thing about these is that you can print photos with shading, and the decal will be permanently fused into the glass surface after kiln-firing. They wouldn’t wear off with use or dish washing, but you have to have a kiln (not just your home oven) to set the designs.
How is sandblasting different from etching cream?
Etching cream is an easy and affordable craft that anyone can try. From my own experience though, the results are not very consistent or professional. Etching cream is a caustic chemical, so you’ll need to wear rubber gloves when handling it. The cream is lumpy and hard to tell if it’s working, so there’s a lot of waiting without any way to check on its progress. The final result will likely be streaky, instead of the solid, even frosting that sandblasting produces. It will be hard to get fine details. The cream may seep underneath your masked areas. It also doesn’t etch very deeply, so it could be hard to feel the texture with your hands when it’s finished.
Sandblasting and etching cream both use stencils, though they are very different. Sandblasting stencils can be made with fancy UV-sensitive self-adhesive material (which we use), but this stencil leaves a very thin clear layer that gets worn away at the beginning of the sandblasting process. These kinds of stencils are very malleable and can be applied to curved surfaces (like a round wine glass). Etching cream stencils need to be completely open so the cream can directly touch all the surfaces you want etched. The good news is that you can buy pre-made reusable stencils for this at craft supply stores, or make your own by cutting vinyl or masking tape, but they're often too stiff to adhere well to a curved surface. You could also use stickers and etch around them. It’s possible that screen printing stencils might work with etching cream, but I haven’t tried them.
How is sandblasting different from rotary tool (Dremel) carving or engraving?
These are two totally different ways to get etched results. If you like to draw freehand, then drawing with a rotary tool (Dremel is a common brand, or similar tool with a diamond-coating) can be really fun. I even created a tutorial of how to use these tools for engraving.
There are also engraving machines with a spinning tool that stays in place, so you just move your glass item around on top of it. This is an old school technique for some fancy cut crystal glassware.
Safety. If you’re cutting glass at all, it’s going to produce a fine dust of glass particles. It doesn’t seem very dangerous, but the invisible particles are very bad for you to breath in. You’ll need to wear a special particulate respirator while working, and you may also want a dust collecting box (I made my own out of particulate filters, a bathroom fan, and a cardboard box for an iMac) to keep that nastiness from spreading all over the room and your clothes. I did this for years, and I can tell you that wearing a heavy rubber respirator is not my favorite way to spend an afternoon, especially in the summer.
I've also had very thin glass items shatter in my hands while engraving on them. The vibrations from the rotary tool can be pretty strong, and a thin Christmas tree ornament ball just isn't sturdy enough to put up with it.
Detail. You can get as much detail as your own hands are capable of producing, which can be pretty amazing. Since you can’t really use a stencil with this method, you’ll need to totally freehand your art, or you can sketch with a marker onto the surface, or use special carbon transfer paper first. You can even engrave gradients and half-tones with a rotary tool, so it’s pretty versatile.
Time consuming. Hand engraving takes a very long time, even for simple designs. Not only do you need to draw every line by hand, but filling in large areas can be very slow. This isn’t great at all for production work, especially if you want the designs to be identical.
Cost. I went through a lot of diamond-coated burrs when I was engraving this way. They’re not that expensive, but it does add up over time, and some of the cheaper ones produce really sub-par results.
Consistency. No two designs will ever truly be the same. That may be a bonus for you (I thought it was cool), but it isn’t everyone’s bag. Another problem is that since the engraved area is being filled in with lots of tiny lines, a large etched area will always appear to have “brush strokes” in it. Sandblasting is more like air brushing or spray painting, where you’re covering a large area at once, so the frosting is very even. You can also sandblast very deeply into glass, ceramic, or stone, but using a rotary tool with diamond burrs will only really be able to etch the very surface. It takes ages to carve all the way through most ceramic glazes, so your results won’t be as bold as sandblasting on a mug.
Engraving enameled glass. I did a lot of experiments with adding an enamel coating to fused glass, and then carving through it with my rotary tool. Although this was possible, it still took an extremely long time to carve deeply enough, and would have only worked well with small jewelry pieces, but not drinking cups.
Want inspiration?
Browse around our site here to see what we can do with sandblasting. Join our mailing list to see the new products we continue to make using our sandblasting system.
What about those Sharpie mugs I've seen people decorate?
Drawing right onto ceramic mugs with markers is super fun! This is a great craft project, as long as you use the right materials and follow directions carefully. Normal Sharpie brand markers will wash off with the first contact with warm water, so you’ll need oil-based markers or glass paint markers. These items will need to be baked in an oven to set the design, and even then, will not stand up to a lot of dishwasher use. The lines will also tend to be wobbly and splotchy, but you can use fun colors and draw anything you like. If you're going to make these yourself, remember to have fun with it!